새소식
반응형
기존 Spring Boot 2.7 이하버전, Spring Security 5.6 이전버전에서는 아래와 같이 설정했다.
.authorizeRequests() 메서드를 통해 허용할 URL, formLogin() 메서드를 통해 로그인 설정 등
많이 바뀐건 아니지만 불필요한 소스를 삭제하고 간단하게 설정하는방법으로 바꼈다고 한다.
Spring Security 5.6 이전버전
기존소스
@Configuration
@EnableWebSecurity
public class SecurityConfig{

	@Autowired
	private AuthenticationUserDetailsService authenticationUserManager;

	@Bean
	public WebSecurityCustomizer configure() {
		return (web) -> web.ignoring().antMatchers("/static/**");
	}

	@Bean
	public SecurityFilterChain filterChain(HttpSecurity http) throws Exception {

		http
			.addFilterBefore(AuthUserProcessingFilter(), UsernamePasswordAuthenticationFilter.class)
			//.csrf().disable()
			.authorizeRequests()
				.antMatchers(
						"/main"
						,"/market/main"
						,"/boast/main"
						,"/server/main"
						,"/auth/**"
					).permitAll()
				.antMatchers("/boast/ins").hasAnyRole("ADMIN", "MEMBER")
				.antMatchers("/**").hasAnyRole("ADMIN")
				.anyRequest().authenticated()
				.and()
					.formLogin()
						.loginPage(SecurityCommon.LOGIN_MAIN_PAGE_URI)
						.loginProcessingUrl(SecurityCommon.LOGIN_PROCESS_URI)
						.defaultSuccessUrl(SecurityCommon.LOGIN_SUCCESS_URI)
						.failureUrl(SecurityCommon.LOGIN_MAIN_PAGE_URI)
						.permitAll()
				.and()
				.logout()
					.logoutRequestMatcher(new AntPathRequestMatcher(SecurityCommon.LOGOUT_URL))
					//.logoutUrl(SecurityCommon.LOGOUT_URL)
					.logoutSuccessUrl("/main")
					.invalidateHttpSession(true)
				.and()
				.exceptionHandling()
					.accessDeniedHandler(accessDeniedHandler())
					.authenticationEntryPoint(authEntiryPoint())
				.and()
				//.csrf().ignoringAntMatchers("/main", "/auth/**").and()
				.sessionManagement()
					.sessionCreationPolicy(SessionCreationPolicy.ALWAYS)
					.maximumSessions(1) // 최대 허용 가능 세션 수
					.maxSessionsPreventsLogin(false)
					.expiredUrl(SecurityCommon.LOGOUT_URL); //세션 만료 시 이동할 페이지 설정

		return http.build();
	}

	....하위내용 생략
}
기존 소스를 보면 .authorizeRequests() 메서드를 사용했지만 Spring Boot 2.7.8 이상? Spring Security 5.6 이후 버전에선
.authorizeHttpRequests() 메서드를 사용하도록 한다.
Spring Security 5.6 이후 버전

위와 같이 동작과정이 굉장히 간단해졌다고 한다.
<dependency>
    <groupId>org.springframework.boot</groupId>
    <artifactId>spring-boot-starter-security</artifactId>
</dependency>
프로젝트 마우스 오른쪽 클릭 > Maven > Update Project... > Update 후 필요한 라이브러리 다운로드
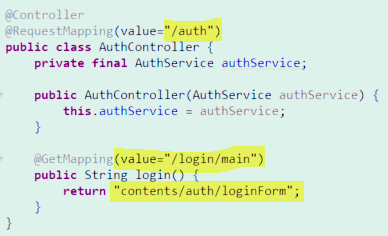
본인은 security, security 안에 config 라는 Package 생성 후 SecurityConfig.class 를 생성했다.

생성 후 아래와 같이 설정한다.
package com.youth.market.security.config;

import org.springframework.context.annotation.Bean;
import org.springframework.context.annotation.Configuration;
import org.springframework.security.config.annotation.web.builders.HttpSecurity;
import org.springframework.security.config.annotation.web.configuration.EnableWebSecurity;
import org.springframework.security.config.annotation.web.configuration.WebSecurityCustomizer;
import org.springframework.security.web.SecurityFilterChain;
import org.springframework.security.web.authentication.UsernamePasswordAuthenticationFilter;

@Configuration
@EnableWebSecurity
public class SecurityConfig {
	@Bean
	public WebSecurityCustomizer configure() {
		return (web) -> web.ignoring().antMatchers("/static/**");
	}

	@Bean
	public SecurityFilterChain filterChain(HttpSecurity http) throws Exception {

		//UsernamePasswordAuthenticationFilter.class
		http
			.authorizeHttpRequests((authorize) -> authorize
					.antMatchers(
							"/auth/**"
					).permitAll()
					// anyRequest() = 모든요청에, authenticated = 인증을 한다.
					.anyRequest().authenticated()
			)
			.formLogin((formLogin) -> formLogin
					.loginPage("/auth/login/main")
					.loginProcessingUrl("/auth/loginCheck")
					.usernameParameter("user_id")
					.passwordParameter("user_pw")
					.defaultSuccessUrl("/main")
					.permitAll()
			);

		return http.build();
	}
}
@Bean
public WebSecurityCustomizer configure() {
return (web) -> web.ignoring().antMatchers("/static/**");
}
web 정적 파일에 대해 허용할 URL 을 설정한다. Spring.io 공식 홈페이지에서 아래와 같이
설정하라고 친절하게 알려주네요...!
출처 : https://spring.io/blog/2022/02/21/spring-security-without-the-websecurityconfigureradapter

.authorizeHttpRequests((authorize) -> authorize
.antMatchers( "/auth/**" ).permitAll()
// anyRequest() = 모든요청에, authenticated = 인증을 한다.
.anyRequest().authenticated()
)
.formLogin((formLogin) -> formLogin
.loginPage("/auth/login/main")
.loginProcessingUrl("/auth/loginCheck")
.failureUrl("/auth/login/main")
.defaultSuccessUrl("/main") .permitAll()
);
.authorizeHttpRequests() : 보안 검사를 진행한다.
.anyRequest() : 어떠한 요청에도
.authenticated() : 인증을 받도록 설정한다.
.formLogin() : 인증은 Form Login 방식으로 진행한다.
공식홈페이지에서 .authorizieHttpRequests 등을 이용해 Spring Security 를 설정하라고
합니다.
출처 : https://spring.io/blog/2022/02/21/spring-security-without-the-websecurityconfigureradapter

.loginPage("/auth/login/main")
인증이 되지 않은 상태인 경우 "/auth/login/main" 을 Mapping URL 을 통해 로그인 페이지로 이동한다.
loginForm.html 은 간단하게 아래처럼 설정했다.
<!DOCTYPE html>
<html xmlns:th="http://www.thymeleaf.org" xmlns:layout="http://www.ultraq.net.nz/thymeleaf/layout" layout:decorate="~{layout/content}">
    <th:block layout:fragment="content">
        <form method="post" th:action="@{/auth/loginCheck}">
            <label for="user_id">ID : </label>
            <input type="text" id="user_id" name="user_id"><br>

            <label for="user_pw">PW : </label>
            <input type="text" id="user_pw" name="user_pw"><br>

            <input type="submit" value="로그인">
        </form>
    </th:block>
</html>
.loginProcessingUrl("/auth/loginCheck")
실제적으로 로그인 버튼을 통해 로그인이 실행될 URL 이다. Controller 에 설정할 필요 없이
loginForm.html 의 form 태그 action 값의 URL과 .loginProcessingUrl("/auth/loginCheck") 값을 동일하게 설정하면
SpringSecurity 에서 인증처리를 진행한다.
Spring Security 의 인증필터인 클래스를 커스터마이징을 하지 않는 이상 기본 Filter 클래스는
AbstractAuthenticationProcessingFilter.class 이다.

그리고 인증Filter 클래스를 상속한 UsernamePasswordAuthenticationFilter.class 가
인증을 진행한다.

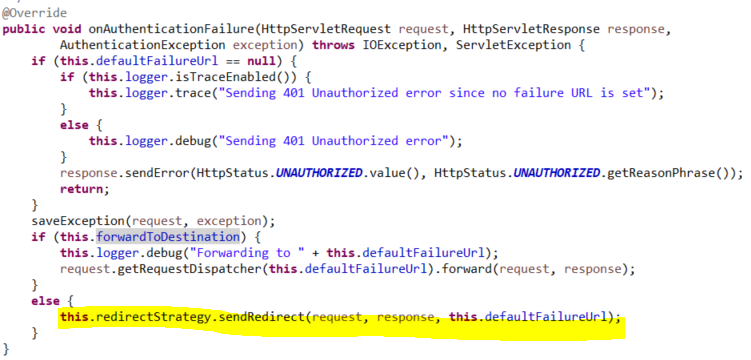
.failureUrl("/auth/login/main")
로그인 인증 처리가 실패했을 때 이동할 URL 설정이다.
아래와 같이 메서드를 가보면 SimpleUrlAuthenticationFailureHandler("/auth/login/main") 같이
설정한다.

SimpleUrlAuthenticationFailureHandler 클래스는 실패했을 때 동작하는 Handler 이며,
아래와 같이 failureUrl 로 redirect 한다.
본인은 AbstractAuthenticationProcessingFilter 클래스를 직접 구현하여 만든 Filter 를 사용하므로
아래와 같이 직접 SimpleUrlAuthenticationFailureHandler 클래스를 확장( extends )하여 사용하거나
인스턴스를 생성하여 Filter 에 직접 설정한다.

위와 같이 설정을 하고 /main URL 로 접근 시 Spring Security 에 의해 로그인 페이지인
"/auth/login/main" 으로 이동하게 된다.

기본적으로 Spring Security 에서 UserName 은 user, Password 는 Console창에 랜덤값으로 알려준다.

user 와 console 패스워드로 접근하게 되면 로그인 되어 인증이 성공된다.
Spring Security 의 기본 인증 Filter 인 AbstractAuthenticationProcessingFilter.class 를 구현한
UsernamePasswordAuthenticationFilter.class 를 사용하지 않고
AbstractAuthenticationProcessingFilter.class 를 직접 상속받아 인증 클래스를 만들어보자.
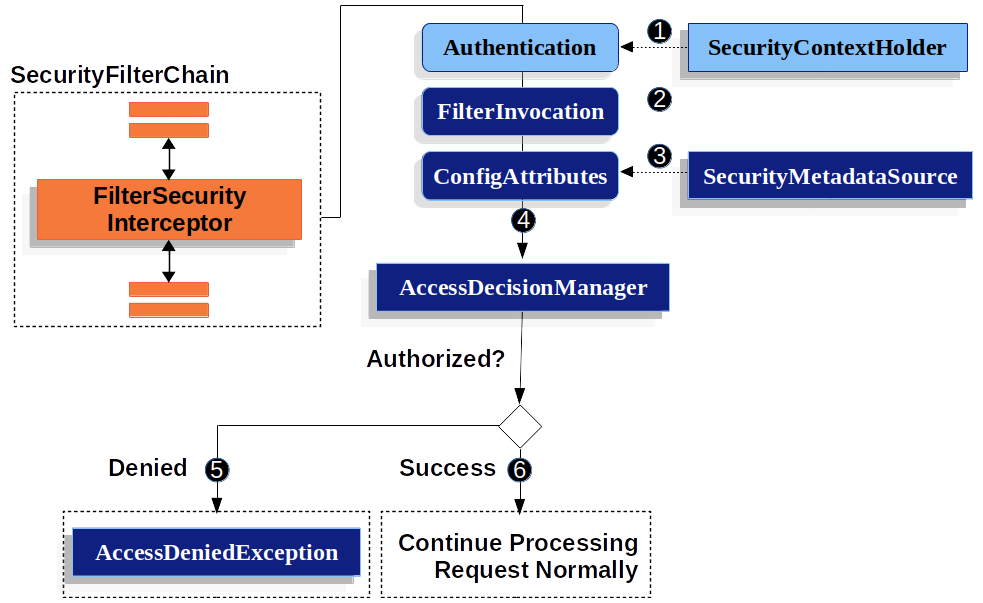
인증 클래스를 진행하기 전 인증 플로우를 봐보자.
기본 Security 인증은 아래와 같은 구조로 이루어진다.
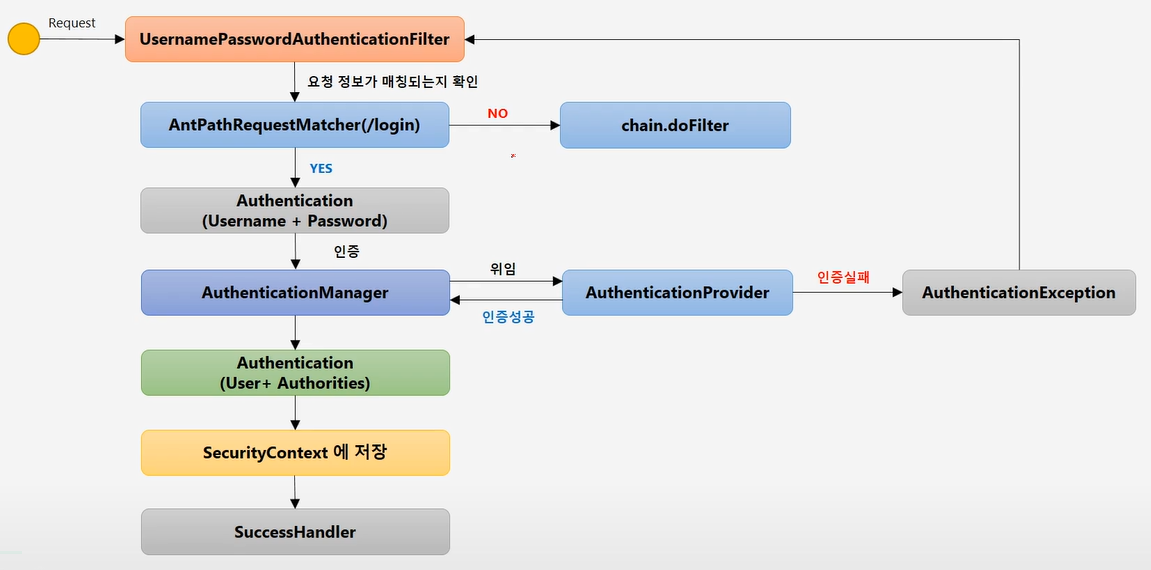
자세한 인증로직 관련 내용은 아래 내용 참고해주세요
https://okimaru.tistory.com/317
4-1. 인증필터 상속받아 구현하기
UsernamePasswordAuthenticationFilter.class 를 사용하지 않고
AbstractAuthenticationProcessingFilter.class 를 직접 상속받아 사용해보자.
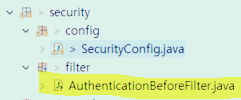
아래와 같이 AuthenticationBeforeFilter.class 를 생성한다.
기본적인 내용은 아래와 같다.
AuthenticationBeforeFilter.class
package com.youth.market.security.filter;

import java.io.IOException;

import javax.servlet.ServletException;
import javax.servlet.http.HttpServletRequest;
import javax.servlet.http.HttpServletResponse;

import org.springframework.security.authentication.UsernamePasswordAuthenticationToken;
import org.springframework.security.core.Authentication;
import org.springframework.security.core.AuthenticationException;
import org.springframework.security.web.authentication.AbstractAuthenticationProcessingFilter;
import org.springframework.security.web.util.matcher.RequestMatcher;

public class AuthenticationBeforeFilter extends AbstractAuthenticationProcessingFilter{

	public AuthenticationBeforeFilter(String processingUrl) {
		super(processingUrl);
	}

	public AuthenticationBeforeFilter(RequestMatcher requiresAuthenticationRequestMatcher) {
		super(requiresAuthenticationRequestMatcher);
	}

    @Override
	public Authentication attemptAuthentication(HttpServletRequest request, HttpServletResponse response)
			throws AuthenticationException, IOException, ServletException {

		String userName = request.getParameter("user_id");
		String userPassword = request.getParameter("user_pw");

		UsernamePasswordAuthenticationToken token = new UsernamePasswordAuthenticationToken(userName, userPassword);

		return this.getAuthenticationManager().authenticate(token);
	}
}
public AuthenticationBeforeFilter(String processingUrl) {
super(processingUrl);
}
public AuthenticationBeforeFilter(RequestMatcher requiresAuthenticationRequestMatcher) {
super(requiresAuthenticationRequestMatcher);
}
AuthenticationBeforeFilter 의 생성자 함수이며 로그인 진행 시 Spring Security 에 설정했던 Processing URL 을
Filter 설정 시 초기 설정하기 위한 함수이다.
@Override
public Authentication attemptAuthentication(HttpServletRequest request, HttpServletResponse response)
throws AuthenticationException, IOException, ServletException {
String userName = request.getParameter("user_id");
String userPassword = request.getParameter("user_pw");
UsernamePasswordAuthenticationToken token =
new UsernamePasswordAuthenticationToken(userName, userPassword);
return this.getAuthenticationManager().authenticate(token);
}
실제적으로 로그인 페이지에서 로그인 진행 시 인증을 담당하는 attemptAuthentication 메서드이다.
HttpServletRequest 를 통해 사용자가 로그인 페이지에서 입력한 user id 값과 password 값을 가져와인증되지 않은 인증토큰에 담아 AuthenticationManager 에게 인증 요청을 한다.
4-2. AuthenticationManager 확인 및 실제 인증을 담당하는 AuthenticationProvider 구현하기
AuthenticationManager.class
UsernamePasswordAuthenticationFilter.class 를 통해 실제 인증을 위임하는 AuthenticationManager 인증관리자이다.


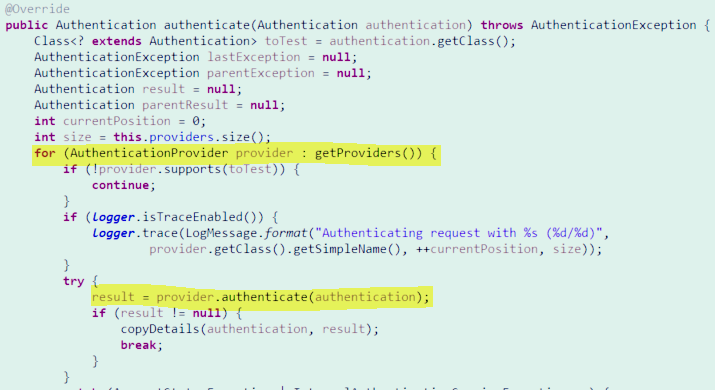
AuthenticationManager 인터페이스를 구현한 기본 클래스는 ProviderManager 이다.

AuthenticationManager 인터페이스를 구현한 ProviderManager는 말 그대로 AuthenticationProvider를
관리하는 Provider Manager이다.
내부적으로 여러가지의 AuthentcationProvider 클래스 타입을 가지고 있다.
이러한 AuthenticationProvider 클래스 중 맞는 클래스를 찾아 위임한다. 실제로 인증을 담당하는 클래스는
AuthenticationProvider 이다.
이러한 Security 인증을 위한 AuthenticationProvider 인터페이스를 직접 구현하여
인증을 진행해보자.
AuthenticationProvider 인터페이스를 구현하지 않을 경우 Spring Security 에서 사용하는
기본적인 클래스는 AbstractUserDetailsAuthenticationProvider 추상 클래스이다.

해당 추상클래스의 authenticate(Authentication authentication) 메서드를 통해
사용자가 입력한 로그인 페이지의 아이디를 통해 db 정보를 불러오고
불러온 데이터를 비교하여 인증된 토큰을 생성하여 반환한다.
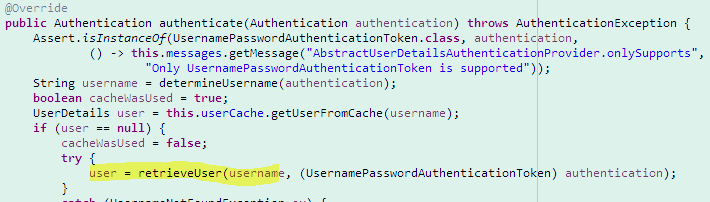
이러한 사용자 DB 데이터, 인증하는 메서드들은 추상메서드이고 실질적으로 데이터를 불러오는
클래스는 DaoAuthenticationProvider 클래스이다.

4-3. 사용자 DB 정보 저장을 위한 UserDetails 인터페이스 구현하기
AuthenticationProvider Custom 클래스를 생성하기 전 사용자가 로그인 페이지에서 입력한
데이터와 비교하기 위한 DB 데이터를 불러와야 한다.
그러기 위해선 Spring Security 에서 사용자 DB 정보를 저장하기 위한 객체인
UserDetails 인터페이스를 구현하여 객체를 만든다.
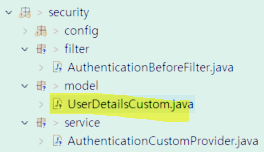
UserDetailsCostom.class
package com.youth.market.security.model;

import java.util.Collection;

import org.springframework.security.core.GrantedAuthority;
import org.springframework.security.core.SpringSecurityCoreVersion;
import org.springframework.security.core.userdetails.UserDetails;

public class UserDetailsCustom implements UserDetails {
private static final long serialVersionUID = SpringSecurityCoreVersion.SERIAL_VERSION_UID;

	private String username;
    private String password;
    private boolean isEnabled;
    private boolean isAccountNonExpired;
    private boolean isAccountNonLocked;
    private boolean isCredentialsNonExpired;
    private Collection<? extends GrantedAuthority>authorities;

    @Override
    public String getUsername() {
        return username;
    }

    public void setUsername(String username) {
        this.username = username;
    }

    @Override
    public String getPassword() {
        return password;
    }

    public void setPassword(String password) {
        this.password = password;
    }

    @Override
    public boolean isEnabled() {
        return isEnabled;
    }

    public void setEnabled(boolean enabled) {
        isEnabled = enabled;
    }

    @Override
    public boolean isAccountNonExpired() {
        return isAccountNonExpired;
    }

    public void setAccountNonExpired(boolean accountNonExpired) {
        isAccountNonExpired = accountNonExpired;
    }

    @Override
    public boolean isAccountNonLocked() {
        return isAccountNonLocked;
    }

    public void setAccountNonLocked(boolean accountNonLocked) {
        isAccountNonLocked = accountNonLocked;
    }

    @Override
    public boolean isCredentialsNonExpired() {
        return isCredentialsNonExpired;
    }

    public void setCredentialsNonExpired(boolean credentialsNonExpired) {
        isCredentialsNonExpired = credentialsNonExpired;
    }

    @Override
    public Collection<? extends GrantedAuthority> getAuthorities() {
        return authorities;
    }

    public void setAuthorities(Collection<? extends GrantedAuthority> authorities) {
        this.authorities = authorities;
    }

	@Override
	public String toString() {
		return "CustomUserDetails [username=" + username + ", password=" + password + ", isEnabled=" + isEnabled
				+ ", isAccountNonExpired=" + isAccountNonExpired + ", isAccountNonLocked=" + isAccountNonLocked
				+ ", isCredentialsNonExpired=" + isCredentialsNonExpired + ", authorities=" + authorities + "]";
	}
}
4-4. 사용자 정보를 불러오기 위한 UserDetailsService 클래스 생성하기
Spring Security 에서 사용자가 입력한 로그인 정보를 통해 DB 정보를 불러오기 위한 인터페이스가
UserDetailsService 인터페이스다.


해당 인터페이스의 loadUserByUsername 메서드는 사용자가 로그인 페이지에서 입력한 ID를 통해
DB 에서 데이터(id, pw, 권한 등)를 불러와 UserDetails 객체를 통해 반환한다.
UserDetailsService 인터페이스를 구현하기 전 DB 데이터를 불러오기 위해
mapper, service 를 설정한다.
UserEntity, AuthMapper.xml, AuthMapper.interface, AuthenticationUserInfoService 클래스 생성한다.
UserEntity.java
package com.youth.market.security.model;

import java.util.Date;

import lombok.Getter;
import lombok.Setter;
import lombok.ToString;

@Getter
@Setter
@ToString
public class UserEntity {
	int seq;
	String user_id;
	String user_name;
	String user_pw;
	String user_role;
	String user_phone;
	Date create_date;
	String update_id;
	Date update_date;
}
AuthMapper.xml
<?xml version="1.0" encoding="UTF-8"?>
<!DOCTYPE mapper PUBLIC "-//mybatis.org//DTD Mapper 3.0//EN" "http://mybatis.org/dtd/mybatis-3-mapper.dtd">

<mapper namespace="com.youth.market.mapper.common.AuthMapper">
	<select id="userIdInfo" parameterType="java.lang.String" resultType="com.youth.market.security.model.UserEntity">
		SELECT *
		FROM m_user WHERE user_id = #{user_name}
	</select>
</mapper>
AuthMapper.interface
package com.youth.market.mapper.common;

import org.apache.ibatis.annotations.Mapper;

import com.youth.market.security.model.UserEntity;

@Mapper
public interface AuthMapper {
	UserEntity userIdInfo(String user_name);
}
AuthenticationUserInfoService class
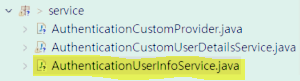
package com.youth.market.security.service;

import org.mybatis.spring.SqlSessionTemplate;
import org.springframework.stereotype.Service;

import com.youth.market.mapper.common.AuthMapper;
import com.youth.market.security.model.UserEntity;

@Service
public class AuthenticationUserInfoService {
	private final SqlSessionTemplate sqlSession;

	public AuthenticationUserInfoService(SqlSessionTemplate sqlSession) {
		this.sqlSession = sqlSession;
	}

	public UserEntity userIdInfo(String user_name) {
		AuthMapper mapper = sqlSession.getMapper(AuthMapper.class);

		return mapper.userIdInfo(user_name);
	}
}
위와 같이 사용자가 입력한 로그인 페이지의 ID를 통해 DB에서 ID, PW, 권한 등 데이터를 불러와
UserEntity 객체에 담는다.
아래와 같이 UserDetailsService 인터페이스를 구현할 클래스를 생성한다.
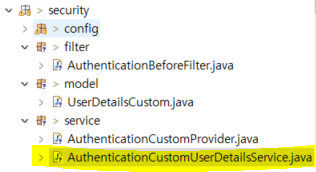
AuthenticationCustomUserDetailsService.java
package com.youth.market.security.service;

import java.util.ArrayList;
import java.util.List;

import org.springframework.beans.factory.annotation.Autowired;
import org.springframework.security.core.GrantedAuthority;
import org.springframework.security.core.authority.SimpleGrantedAuthority;
import org.springframework.security.core.userdetails.UserDetails;
import org.springframework.security.core.userdetails.UserDetailsService;
import org.springframework.security.core.userdetails.UsernameNotFoundException;

import com.youth.market.security.model.UserDetailsCustom;
import com.youth.market.security.model.UserEntity;

@Service
public class AuthenticationCustomUserDetailsService implements UserDetailsService {

	@Autowired
	private AuthenticationUserInfoService service;

	@Override
	public UserDetails loadUserByUsername(String username) throws UsernameNotFoundException {
		UserEntity userEntity = service.userIdInfo(username);
		UserDetailsCustom userDetails = new UserDetailsCustom();

		if(userEntity != null) {
			List<GrantedAuthority> authorities = new ArrayList<GrantedAuthority>();
			authorities.add(new SimpleGrantedAuthority("ROLE_"+userEntity.getUser_role()));

			userDetails.setUsername(userEntity.getUser_id());
			userDetails.setPassword(userEntity.getUser_pw());
			userDetails.setEnabled(true);
			userDetails.setAccountNonExpired(true);
			userDetails.setAccountNonLocked(true);
			userDetails.setCredentialsNonExpired(true);
			userDetails.setAuthorities(authorities);
		}else {
			throw new UsernameNotFoundException("사용자가 입력한 아이디에 해당하는 사용자를 찾을 수 없습니다.");
		}

		return userDetails;
	}
}
사용자 ID를 통해 불러온 데이터를 UserDetails 객체에 담아 반환한다.
4-5. AuthenticationProvider 인터페이스 구현하기
UserDetailsService 를 통해 불러온 DB 데이터와 사용자가 로그인 페이지에서 입력한 데이터를 비교하는 로직을
담당하는 AuthenticationProvider 인터페이스이다.
아래와 같이 AuthenticationCustomProvider 클래스를 생성하여 구현한다.
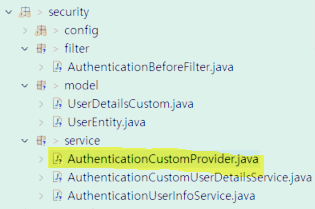
AuthenticationCustomProvider.java
package com.youth.market.security.service;

import org.springframework.security.authentication.AuthenticationProvider;
import org.springframework.security.authentication.BadCredentialsException;
import org.springframework.security.authentication.UsernamePasswordAuthenticationToken;
import org.springframework.security.core.Authentication;
import org.springframework.security.core.AuthenticationException;
import org.springframework.security.core.userdetails.UsernameNotFoundException;

import com.youth.market.security.model.UserDetailsCustom;

public class AuthenticationCustomProvider implements AuthenticationProvider {

	private final AuthenticationCustomUserDetailsService service;

	public AuthenticationCustomProvider(AuthenticationCustomUserDetailsService service) {
		this.service = service;
	}

	@Override
	public Authentication authenticate(Authentication authentication) throws AuthenticationException {

		UserDetailsCustom userDetails = (UserDetailsCustom) service.loadUserByUsername(authentication.getName());

		if(userDetails != null) {
			throw new UsernameNotFoundException("Not Found username ("+authentication.getName()+")");
		}

		if(!userDetails.getPassword().equals(authentication.getCredentials().toString())) {
			throw new BadCredentialsException("Invalid password ("+authentication.getName()+")");
		}

		return new UsernamePasswordAuthenticationToken(userDetails.getUsername(), userDetails.getPassword(), userDetails.getAuthorities());
	}

	public boolean supports(Class<?> authentication) {
		return UsernamePasswordAuthenticationToken.class.isAssignableFrom(authentication);
	}
}
UserDetailsService 인터페이스를 구현한 AuthenticationCustomProvider 클래스를 통해 사용자 DB정보를 불러오고
사용자가 입력한 데이터를 비교해 인증된 Token 을 반환한다.
위 AuthenticationBeforeFilter 를 아래와 같이 Bean 등록을 한다.
등록 후 Security 설정의 addFilterBefore 메서드를 통해 Spring Security 의 기본 인증 필터인
UsernamePasswordAuthenticationFilter.class 대신 AuthenticationBeforeFilter 를 설정한다.
package com.youth.market.security.config;

import org.springframework.beans.factory.annotation.Autowired;
import org.springframework.context.annotation.Bean;
import org.springframework.context.annotation.Configuration;
import org.springframework.security.authentication.AuthenticationManager;
import org.springframework.security.authentication.ProviderManager;
import org.springframework.security.config.annotation.web.builders.HttpSecurity;
import org.springframework.security.config.annotation.web.configuration.EnableWebSecurity;
import org.springframework.security.config.annotation.web.configuration.WebSecurityCustomizer;
import org.springframework.security.web.SecurityFilterChain;
import org.springframework.security.web.authentication.UsernamePasswordAuthenticationFilter;

import com.youth.market.security.filter.AuthenticationBeforeFilter;
import com.youth.market.security.service.AuthenticationCustomProvider;
import com.youth.market.security.service.AuthenticationCustomUserDetailsService;

@Configuration
@EnableWebSecurity
public class SecurityConfig {

	@Autowired
	private AuthenticationCustomUserDetailsService authenticationCustomUserDetailsService;

	@Bean
	public WebSecurityCustomizer configure() {
		return (web) -> web.ignoring().antMatchers("/static/**");
	}

	@Bean
	public SecurityFilterChain filterChain(HttpSecurity http) throws Exception {

		http
			.addFilterBefore(authenticationProcessingFilter(), UsernamePasswordAuthenticationFilter.class)
			.authorizeHttpRequests((authorize) -> authorize
					.antMatchers(
							"/auth/**"
					).permitAll()
					// anyRequest() = 모든요청에, authenticated = 인증을 한다.
					.anyRequest().authenticated()
			)
			.formLogin((formLogin) -> formLogin
					.loginPage("/auth/login/main")
					.defaultSuccessUrl("/main")
					.failureUrl("/auth/login/main")
					.permitAll()
			);

		return http.build();
	}

	@Bean
	public AuthenticationBeforeFilter authenticationProcessingFilter() {
		AuthenticationBeforeFilter filter = new AuthenticationBeforeFilter("/auth/loginCheck");
		filter.setAuthenticationManager(authenticationManager());
		return filter;
	}

	@Bean
	public AuthenticationManager authenticationManager() {
		return new ProviderManager(new AuthenticationCustomProvider(authenticationCustomUserDetailsService));
	}
}
@Bean
public AuthenticationBeforeFilter authenticationProcessingFilter() {
AuthenticationBeforeFilter filter = new AuthenticationBeforeFilter("/auth/loginCheck");
filter.setAuthenticationManager(authenticationManager());
return filter;
}
AuthenticationBeforeFilter 를 반환하는 메서드를 생성한다.
@Bean 어노테이션을 통해 자바 Bean 객체로 설정했으며 filter 의 setAuthenticationManager 를 통해
이전에 인증관리자인 AuthenticationManager 인터페이스를 구현한 ProviderManager 에
실제 인증 작업을 하는 AuthenticationManager 를 추가하여 넘긴다.
@Bean
public AuthenticationManager authenticationManager() {
return new ProviderManager(new
AuthenticationCustomProvider(authenticationCustomUserDetailsService));
}
인증 커스텀 필터인 AuthenticationBeforeFilter 에 실질적인 인증 프로세스를 담당하는
AuthenticationProvider 인터페이스를 구현한 커스텀 클래스인 AuthenticationCustomProvider 를
생성하여 AuthenticationManager를 반환한다.

위 이미지처럼 AuthenticationManager 인증관리자 인터페이스를 기본적으로
구현하는 ProviderManager 에 AuthenticationCustomProvider 커스텀 Provider 클래스를
설정한다.
이제 설정한 로그인 URL 인 "/auth/loginCheck" 로 로그인을 진행해보면 정상적으로 되는걸 확인할 수 있다.
하지만 .defaultSuccessUrl 로 설정했던 URL 로 이동하지 않고 "/" 경로로만 이동하는걸 확인할 수 있다.
해당 문제는 좀더 찾아보기로 하고 해결 방법은 AuthenticationSuccessHandler 인터페이스를
구현하는 클래스를 상속받아 직접 defaultSuccessUrl 을 설정하게 되면 필요한 URL 로 이동할 수 있다.
AuthenticationSuccessHandler 인터페이스를 구현하는 클래스 순서는 다음과 같다.
AuthenticationSuccessHandler > AbstractAuthenticationTargetUrlRequestHandler >
SimpleUrlAuthenticationSuccessHandler > SavedRequestAwareAuthenticationSuccessHandler 클래스이다.


SavedRequestAwareAuthenticationSuccessHandler 클래스를 상속받아 defaultSuccessUrl 을 설정해보자.
6-1. 상속받을 클래스인 AuthenticationCustomSuccessHandler 클래스를 생성
아래와 같이 클래스를 생성한다.
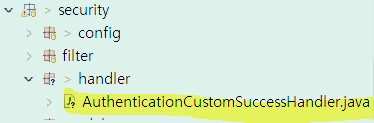
생성 후 아래와 같이 클래스에 내용을 설정한다.
로그인 성공 시 아래 클래스 로직을 거치게 되며 response.sendRedirect 를 통해 URL 을 리다이렉트 한다.
AuthenticationCustomSuccessHandler.java
package com.youth.market.security.handler;

import java.io.IOException;

import javax.servlet.ServletException;
import javax.servlet.http.HttpServletRequest;
import javax.servlet.http.HttpServletResponse;

import org.springframework.security.core.Authentication;
import org.springframework.security.web.authentication.SavedRequestAwareAuthenticationSuccessHandler;

public class AuthenticationCustomSuccessHandler extends SavedRequestAwareAuthenticationSuccessHandler {

	public AuthenticationCustomSuccessHandler(String defaultTargetUrl) {
		this.setDefaultTargetUrl(defaultTargetUrl);
	}

	@Override
	public void onAuthenticationSuccess(HttpServletRequest request, HttpServletResponse response,
			Authentication authentication) throws ServletException, IOException {

		response.sendRedirect(request.getContextPath() + "/main");
	}
}
6-2. Spring Security 커스텀 인증 필터에 설정하기
아래와 같이 SecurityConfig 클래스에 Bean 등록을 한다.

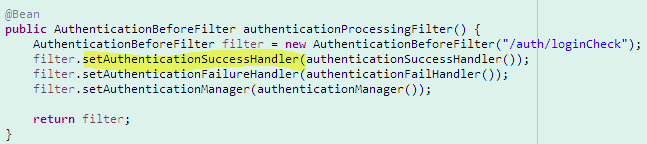
@Bean
public AuthenticationCustomSuccessHandler authenticationSuccessHandler() {
    return new AuthenticationCustomSuccessHandler("/main/test");
}
등록 후 아래와 같이 커스텀 인증 필터에 setAuthenticationSuccesHandler 메서드를 통해 설정한다.
위 클래스처럼 SavedRequestAwareAuthenticationSuccessHandler 클래스를 상속받아
커스텀 Success 클래스를 만들지 않으면 기본적으로 아래와 같이 sendRedirect 를 시킨다
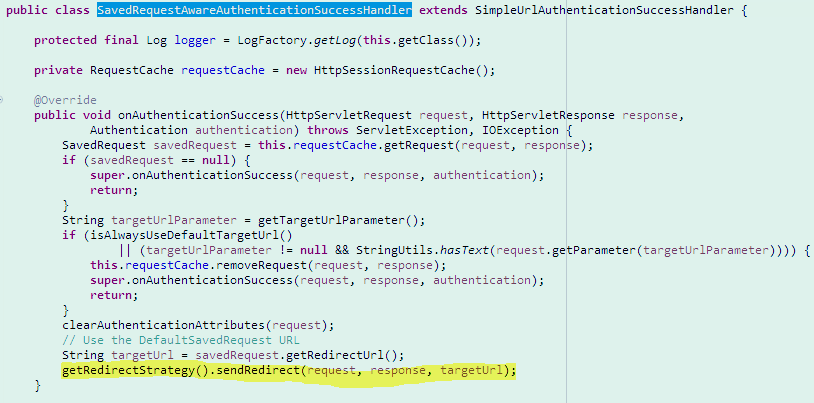
RedirectStrategy 의 Redirect 전략을 통해서 아래와 같이 URL 을 만들어 response.sendRedirect 메서드를 통해
특정 URL 로 리다이렉트 시킨다.

설정하지 않을 경우 실패 핸들러의 기본 구현 클래스는 아래와 같다.

위 SimpleUrlAuthenticationFailureHandler 클래스를 상속받아 실패할 경우 이동할 URL 을 설정한다.
7-1. AuthenticationCustomFailHandler 클래스 생성
아래와 같이 클래스를 생성한다.

AuthenticationCustomFailHandler
package com.youth.market.security.handler;

import java.io.IOException;

import javax.servlet.ServletException;
import javax.servlet.http.HttpServletRequest;
import javax.servlet.http.HttpServletResponse;

import org.springframework.security.core.AuthenticationException;
import org.springframework.security.web.authentication.SimpleUrlAuthenticationFailureHandler;

public class AuthenticationCustomFailHandler extends SimpleUrlAuthenticationFailureHandler {

	@Override
	public void onAuthenticationFailure(HttpServletRequest request, HttpServletResponse response,
			AuthenticationException exception) throws IOException, ServletException {

		setDefaultFailureUrl("/auth/login/main?errorCode=123");

		super.onAuthenticationFailure(request, response, exception);
	}
}
7-2. Spring Security Filter 에 설정하기
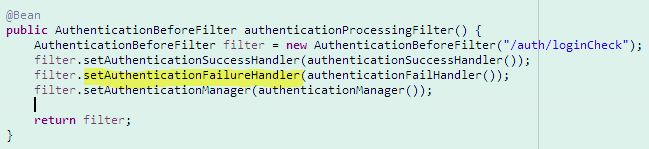
아래와 같이 SecurityConfig 클래스에 Bean 등록을 한다.

@Bean
public AuthenticationCustomFailHandler authenticationFailHandler() {
    return new AuthenticationCustomFailHandler();
}
Spring Security 커스텀 인증필터에 setAuthenticationFailureHandler 메서드를 통해 실패 핸들러를 등록한다.
Spring Security 에 로그아웃 URL 을 설정하여 Html 화면에서 특정 URL 로 POST 요청 시
로그아웃이 설정된다.
8-1. Spring Security 설정
@Bean
public SecurityFilterChain filterChain(HttpSecurity http) throws Exception {
http
.addFilterBefore(authenticationProcessingFilter(), UsernamePasswordAuthenticationFilter.class)
.csrf().disable()
.authorizeHttpRequests((authorize) -> authorize
.antMatchers(
"/auth/*"
).permitAll()
// anyRequest() = 모든요청에, authenticated = 인증을 한다.
.anyRequest().authenticated()
)
.formLogin((formLogin) -> formLogin
.loginPage("/auth/login/main")
.failureUrl("/auth/login/main")
.permitAll()
)
.logout((logout) -> logout
.logoutRequestMatcher(new AntPathRequestMatcher("/auth/logout"))
.logoutSuccessUrl("/auth/login/main")
);
return http.build();
}
위와 같이 로그아웃에 대한 설정을 해준다.
.logoutRequestMatcher(new AntPathRequestMatcher("/auth/logout"))
요청 URL 에 대해 "/auth/logout" 요청이 들어올 경우 Spring Security 에서 감지하여 로그아웃을 진행한다.
.logoutSuccessUrl("/auth/login/main")
로그아웃이 성공했을 때 이동할 URL 설정이다.
8-2. HTML 및 Javascript 설정
HTML
<a id="menuLogout" class="nav-link scrollto" onclick="topLogout()">로그아웃</a>
Javascript
let topLogout = function(){
$.post(contextPath + "/auth/logout", function(data){
location.assign(contextPath + "/auth/login/main");
})
}
| Spring Boot 에 Vue.js 사용 및 Vue.js 프로젝트 기본구조 (0) | 2024.01.03 |
|---|---|
| Spring Boot Context Path 설정하는 방법 (0) | 2023.11.23 |
| html 을 이용한 대용량 파일 다운로드 (0) | 2023.07.03 |
| @RequestBody, @RequestParam, @RequestPart (0) | 2023.05.15 |
| Spring Boot XSS Filter 설정(lucy-xss-servlet-filter) (0) | 2023.05.02 |
소중한 공감 감사합니다